9 Common BJJ Grips and Their Uses
Nine essential BJJ grips explained with formation, Gi/No-Gi uses, strengths, weaknesses, and practical training tips.
Written by BJJ Academy Finder Editorial Team
9 Common BJJ Grips and Their Uses
In Brazilian Jiu-Jitsu (BJJ), grips dictate control, movement, and submission setups. Mastering grips isn't just about strength; it's about technique and strategy. Here are 9 common grips every practitioner should know:
- C-Grip: Quick control for transitions, like arm drags or guillotines.
- S-Grip: Secure for chokes (e.g., head and arm triangle) and body locks.
- Gable Grip: Tight, thumbless hold ideal for submissions and body control.
- Ball and Socket Grip: Versatile for chokes and maintaining control.
- Monkey Grip: Thumbless grip for clinches and limb control.
- Americana (Figure-Four) Grip: Key for arm submissions and isolations.
- Butterfly Grip: Effective for sweeps and back control.
- Pretzel Grip: Specialized for arm-in guillotine chokes.
- Collar and Sleeve Grip: Vital for Gi-specific sweeps and takedowns.
Each grip has its strengths and limitations, suited for different scenarios in both Gi and No-Gi settings. Strong grips can turn the tide of a match, so practice is key. If you're looking to sharpen these skills, find a BJJ gym near you to start training.
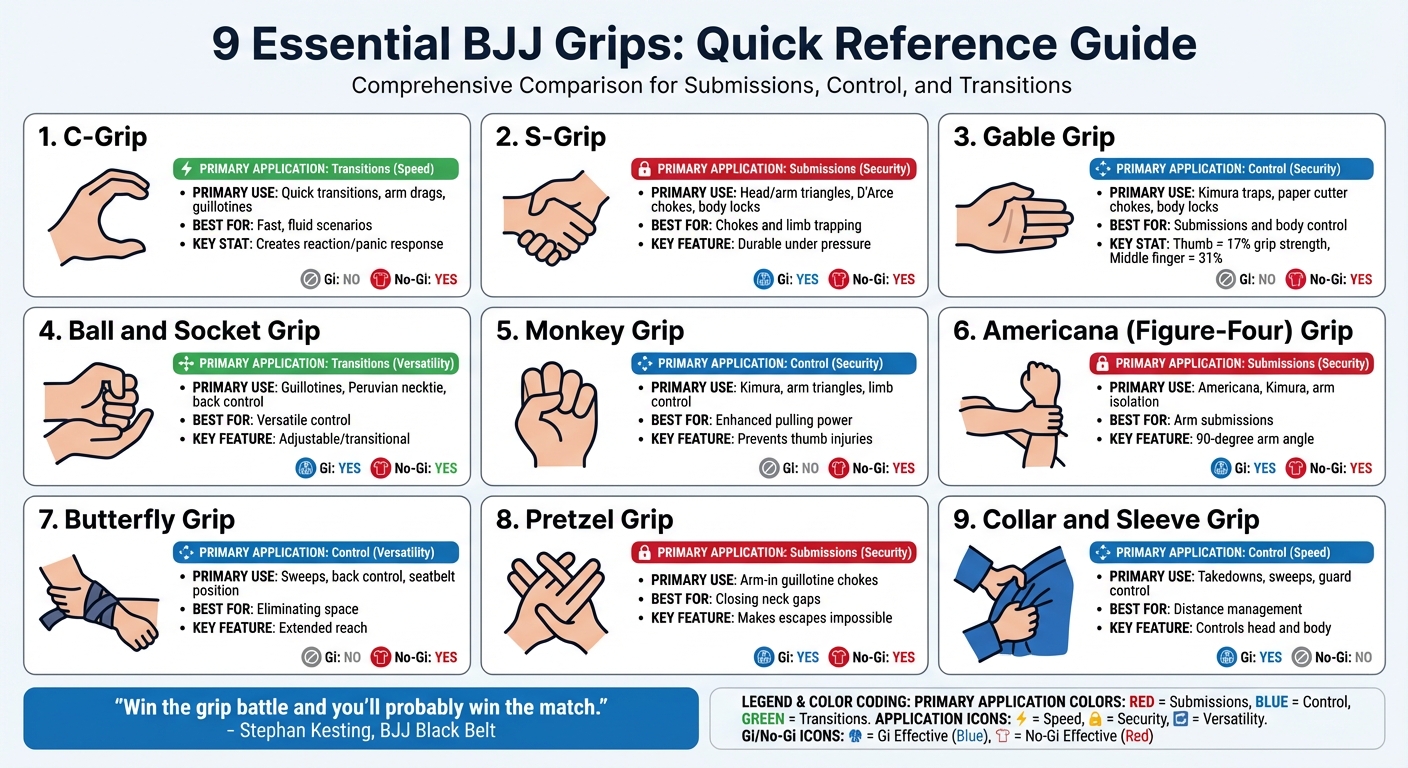
9 Essential BJJ Grips Comparison Chart: Applications and Effectiveness
1. C-Grip
Mechanics and Formation of the Grip
The C-Grip gets its name from the natural "C" shape your hand forms when your thumb is positioned opposite your four fingers. Imagine your hand wrapping around an opponent's wrist or ankle - this is the essence of the grip. In No-Gi Brazilian Jiu-Jitsu, the C-Grip is a foundational tool for gaining initial control. To maximize its effectiveness, keep your elbows tucked close to your sides while securing the grip, especially when controlling the wrist.
Primary Applications (Stand-Up, Ground, Submissions)
Travis Stevens highlights the C-Grip's utility:
"An example of a guiding grip is the C Grip; which is used to set up a reaction or panic response by moving your partner's hands around".
This grip shines in situations requiring quick reactions, such as scrambles, escapes, or initiating attacks like arm drags and guillotines. On the ground, it’s particularly useful for controlling an opponent's ankles during guard passes or redirecting their head to disrupt posture. From a standing position, it aids in creating kuzushi (off-balancing), setting up takedowns effectively.
Advantages and Limitations
The C-Grip is perfect for fast, fluid scenarios where you need to provoke a reaction and quickly transition into a stronger position. It’s energy-efficient and works seamlessly in both Gi and No-Gi settings. However, its open-loop structure makes it less secure. Opponents can often escape by rotating their wrist toward the open side of the "C." As Stevens points out:
"They are not good applications for a holding grip".
Treat the C-Grip as a tool to create opportunities rather than a grip for prolonged control. Transition swiftly to more secure grips, like the Kimura or Gable Grip, to maintain dominance. Up next, we’ll dive into another essential grip: the S-Grip.
sbb-itb-d583f1e
2. S-Grip
Mechanics and Formation of the Grip
The S-Grip stands out as a distinct hand-to-hand interlocking technique designed for enhanced control. It gets its name from the "S" shape formed by intertwining one palm-up hand with one palm-down hand. This opposite palm alignment creates a curved yet secure grip, making it highly dependable. Unlike single-handed grips like the C-Grip, the S-Grip links both hands together, effectively uniting the arms for improved stability and strength.
Primary Applications (Stand-Up, Ground, Submissions)
The S-Grip shines in various scenarios, particularly in executing chokes like the head and arm triangle, Darce choke, and paper cutter choke. On the ground, it becomes a valuable tool for trapping limbs and securing body locks, aiding in guard passes and maintaining back control. In stand-up situations, it’s effective for clinching larger opponents and plays a key role in double-leg takedowns and lifts. Additionally, when defending against armbars, turning the attacked arm away and applying the S-Grip helps prevent the arm from being extended.
Advantages and Limitations
The S-Grip is known for its durability under pressure, resisting breaks and maintaining control. Its extended reach makes it particularly useful for encircling larger opponents. However, it demands strong finger flexors, which can be developed through isometric exercises like squeezing a medicine ball. While it works well in both Gi and No-Gi scenarios, the S-Grip is less versatile compared to the Gable grip, making it most effective as a specialized tool for chokes and body locks.
3. Gable Grip
Mechanics and Formation of the Grip
The Gable Grip brings both hands together in a palm-to-palm connection without using the thumbs. To form this grip, place your four fingers over the fleshy area beneath the little finger (the carpal bones) for a firm lock. This thumbless design isn't just a random choice - it’s backed by research. According to Cha et al., the thumb contributes only 17% of total grip strength, while the middle and index fingers contribute 31% and 22%, respectively. By keeping the thumb out of the equation, you avoid creating a weak point in the grip. This setup also eliminates extra space within the hold, making it much harder for opponents to break apart your grip. This structure is the foundation for its wide range of uses.
Primary Applications (Stand-Up, Ground, Submissions)
Thanks to its tight, compact nature, the Gable Grip is a favorite in both standing and ground-based techniques. In stand-up grappling, it’s commonly used for body locks, helping control an opponent's torso and setting up takedown attempts . On the ground, it shines in positions like the Kimura trap, seatbelt control during back takes, and front headlocks . The grip's secure hold is ideal for trapping limbs and limiting an opponent's ability to move.
When it comes to submissions, the Gable Grip is a key player. It’s essential for finishing moves like the paper cutter choke, head and arm triangle, Darce choke, and various compression locks . Its adaptability has made it a staple in Brazilian Jiu-Jitsu (BJJ). As BJJ Fanatics puts it:
"The gable grip is one of the most popular grips, because of the versatility of how the grip can be administered".
Advantages and Limitations
The biggest strength of the Gable Grip lies in its tight, thumbless alignment, which forms a strong seal around your opponent's body or limbs. This design leaves no obvious weak spots for opponents to exploit. However, beginners often make the mistake of tucking their thumbs inside the grip. This weakens the hold and increases the risk of injury. To maximize the grip's effectiveness, practitioners can train with isometric exercises, like squeezing a medicine ball in a body lock position. This mimics the pressure and engagement needed in live grappling situations.
4. Ball and Socket Grip
Mechanics and Formation of the Grip
The Ball and Socket Grip works by linking your hands together rather than directly gripping your opponent. To set it up, place one hand - usually your "choking" hand - underneath the other, creating a firm connection. This grip is adjustable, allowing you to slide along your hand or forearm to accommodate your opponent's size. Instead of squeezing with your fingers, focus on engaging your wrists and arms for better control and reduced strain.
Primary Applications (Stand-Up, Ground, Submissions)
This grip is excellent for controlling your opponent's torso using a closed-chain isometric squeeze. In stand-up grappling, it’s particularly useful for maintaining control over the waist, upper body, or legs during sweep single takedowns. On the ground, it shines in the seat-belt position, a key setup for taking the back and controlling the upper body. When it comes to submissions, the Ball and Socket Grip is a favorite for finishing techniques like the guillotine choke and Peruvian necktie. For these chokes, hiding your choking hand beneath the supporting hand adds an extra layer of security, making it harder for your opponent to break your grip.
Advantages and Limitations
The biggest strength of this grip is its flexibility. You can seamlessly transition into other grip styles, such as the Gable, Pretzel, or 10-finger grips, depending on the situation. This versatility makes it especially effective in no-gi grappling, though it’s equally reliable in gi scenarios. To build the strength needed for this grip, incorporate isometric medicine ball squeezes into your training routine, as they replicate the kind of pressure required in live grappling. Up next, we’ll dive into the Monkey Grip and explore how it stands out in different situations.
5. Monkey Grip
Mechanics and Formation of the Grip
The Monkey Grip, also known as the monkey paw or cupping grip, is a thumbless grip where all four fingers wrap around an opponent's limb or neck, while the thumb stays tucked against the index finger. Unlike traditional grips that involve wrapping the thumb around, this method eliminates a potential weak point. By relying on the stronger finger flexors, the grip becomes more secure and less prone to slipping.
Primary Applications (Stand-Up, Ground, Submissions)
In stand-up grappling, the Monkey Grip shines during clinches and neck ties (like collar ties), where it’s used to control the back of an opponent's head and disrupt their posture. On the ground, it’s particularly effective for controlling limbs - whether cupping ankles, gripping triceps, or holding onto lats during sweeps. When it comes to submissions, this grip is a go-to for executing techniques like the Kimura shoulder lock, arm triangles, and straight arm locks.
Advantages and Limitations
One major advantage of the Monkey Grip is its enhanced pulling power. As Elite Sports explains:
"The BJJ monkey grip requires you to grip with your four palm fingers rather than your thumb... This makes it easy for you to make your hands strong enough to pull your opponents towards your body".
This grip also reduces the risk of thumb injuries and prevents opponents from exploiting small joint manipulation, which can sometimes occur with traditional grips. However, it does have its drawbacks. As a single-handed grip, it’s more susceptible to being broken compared to two-handed options like the Gable or S-grip. Additionally, if the grip isn’t kept tight, opponents may be able to slip their limbs out of the cupping hold.
Next, the Americana (Figure-Four) Grip builds on these principles to enhance submission setups.
Guide to Grip Usage for Grappling | Jiu-Jitsu Fundamentals
6. Americana (Figure-Four) Grip
The Americana grip, also called the figure-four or keylock, is a powerful tool for controlling your opponent's arm and setting up submissions.
How to Form the Americana Grip
To create the Americana grip, start by grabbing your opponent's wrist with one hand. Then, slide your other arm under their tricep and secure your own wrist, forming a figure-four shape. The key detail here is the "L" shape - your opponent's arm should be bent at about a 90-degree angle, with their forearm pointing upward. This upward-pointing forearm is what distinguishes an Americana from a Kimura, where the forearm points downward.
When locking your wrist, using a monkey grip (keeping your thumb on the same side as your fingers) ensures a tighter connection, leaving no gaps for your opponent to escape. This grip builds on basic arm control techniques, offering a more secure hold that’s ideal for setting up submissions.
Where and When to Use It
The Americana grip shines in various grappling scenarios. On the ground, it’s highly effective from dominant positions like mount or side control. Not only does it apply pressure to the shoulder for a submission, but it also helps isolate your opponent’s arm, making it harder for them to defend or post during guard passes and sweeps.
In stand-up situations, the figure-four grip can be used to control an arm during clinches. It’s also a great setup for takedowns, as it disrupts your opponent’s posture and balance.
Strengths and Weaknesses
The Americana grip is known for its strong, secure hold. It works well in both Gi and No-Gi settings, making it a versatile option. However, it does have its limitations. Since both your hands are focused on controlling one arm, you may find it harder to maintain balance or defend against other attacks. Additionally, getting your second arm into position can be tricky if your opponent has a tight defense.
Despite these challenges, the Americana grip remains a reliable choice for those looking to control and neutralize their opponent effectively.
7. Butterfly Grip
Mechanics and Formation of the Grip
The butterfly grip is all about wrapping your hands around your forearms instead of going for the classic palm-to-palm connection. Think of it as a variation of the gable grip, but with an extended reach. This setup not only secures your opponent's arms but also uses bent wrist hooks to add extra grip strength. For maximum control, keep your elbows snug against your ribs, creating a tight, compact frame that pulls your opponent closer.
Primary Applications (Stand-Up, Ground, Submissions)
Originally rooted in wrestling, the butterfly grip has become a go-to in both Gi and No-Gi Brazilian Jiu-Jitsu. On the ground, it's a favorite for back control in the seatbelt position, where a tight chest-to-back connection leaves little room for escape. It’s also a reliable choice in open guard for sweeps and in half guard when locking in double underhooks. In stand-up scenarios, the grip shines during takedowns like sweep singles and in Greco-Roman throws, where closing the gap quickly is essential. AJ Agazarm, a well-known BJJ athlete, even brought this grip into the spotlight, dubbing it the "Agazarm" grip.
Advantages and Limitations
The butterfly grip is all about control, making it perfect for situations where eliminating space is key. By keeping your elbows tight against your body, you create a secure hold that’s tough to break. The bent wrist hooks only add to its strength. That said, it’s not without its drawbacks. While it excels in locked-in positions, it’s not as quick or flexible for transitions compared to grips like the ball and socket, which offer more versatility.
8. Pretzel Grip
The pretzel grip stands out as a distinctive technique, particularly effective for No-Gi submissions.
How to Form the Pretzel Grip
This grip involves an unconventional hand positioning. Start by keeping the palm of your choking hand open. Then, use your non-choking hand to reach around your opponent's arm and clasp your choking hand. Unlike typical grips where thumbs are adjacent, the non-choking hand’s fingers point downward, with thumbs positioned on opposite sides. While this setup might feel odd at first, it works to eliminate any gaps around your opponent's neck and arm.
Best Use: No-Gi Ground Submissions
The pretzel grip is primarily used for No-Gi submissions, with its most effective application being the arm-in guillotine choke. Its unique structure helps close off spaces that opponents could otherwise exploit to escape. As BJJ Heroes explains:
"The Pretzel is not seen often in wrestling, having in its best application clearing any gaps/spaces when attacking the neck".
Strengths and Drawbacks
The pretzel grip’s strength lies in its ability to remove the space opponents need to defend, making escapes nearly impossible. Elite Sports describes it as:
"a perfect hack for making an arm-in guillotine impossible to escape from".
However, the grip’s unusual alignment can feel awkward and limits its use to arm-in guillotines rather than broader applications like general control or takedowns.
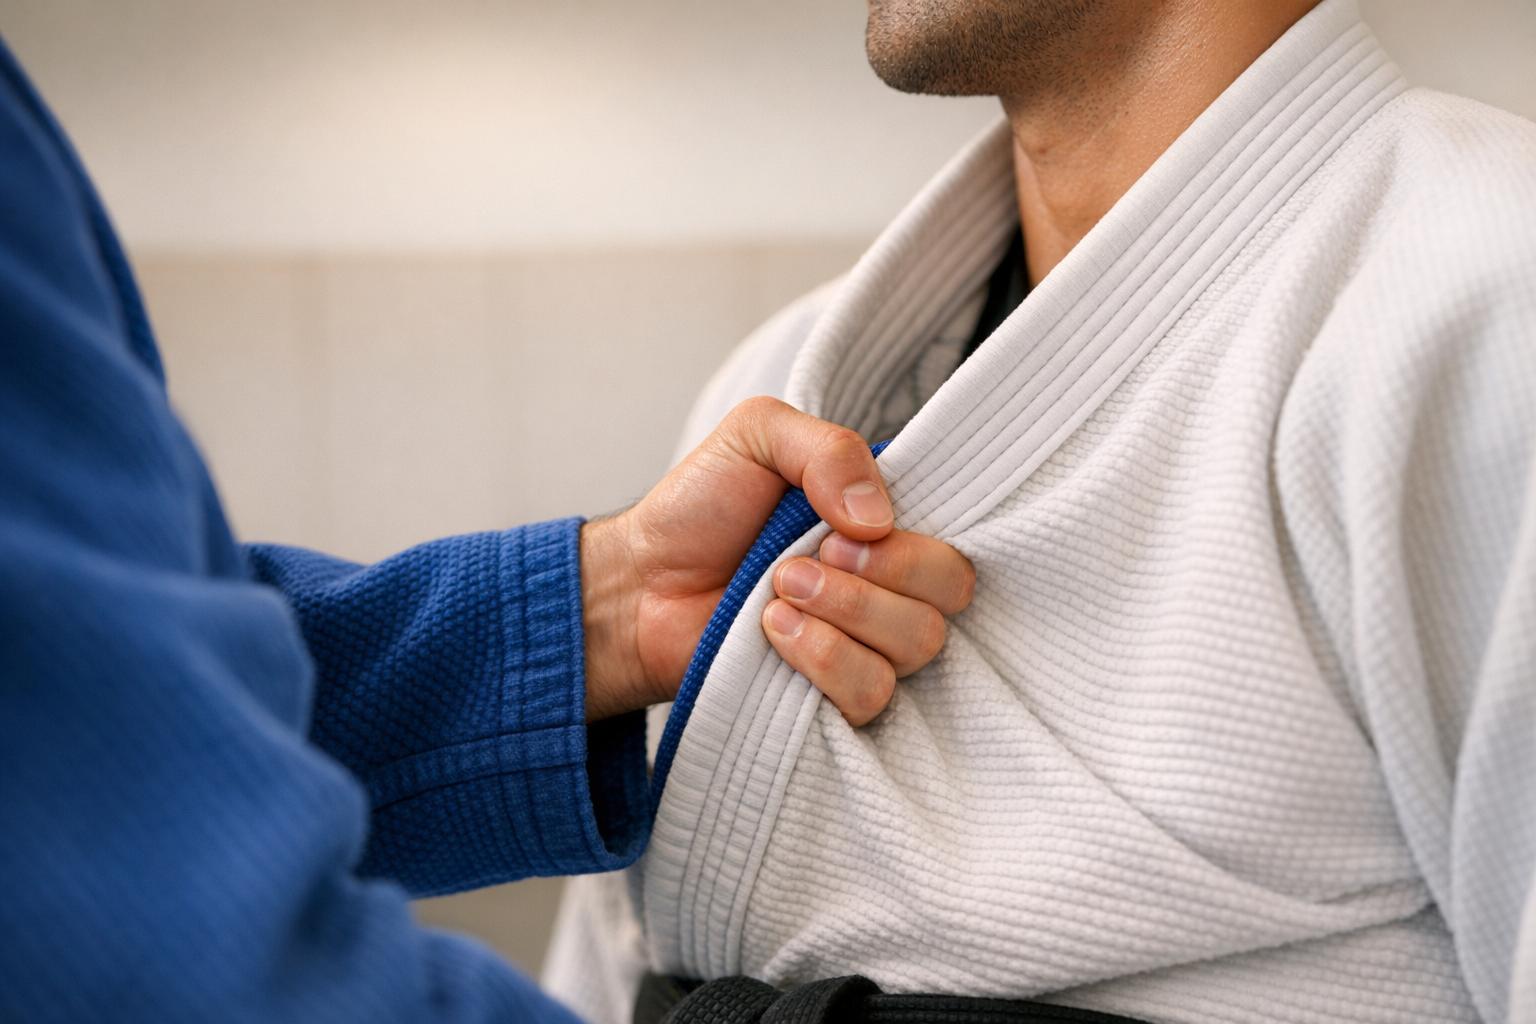
9. Collar and Sleeve Grip
The collar and sleeve grip is a cornerstone technique in Brazilian Jiu-Jitsu. It involves controlling your opponent's lapel with one hand while gripping their sleeve with the other. This grip builds on earlier hand-control strategies, combining lapel and sleeve management for increased flexibility in both offense and defense.
Mechanics and Formation of the Grip
Start by securing the collar grip: slide four fingers inside the lapel while keeping your thumb on the outside. Follow this by establishing a solid sleeve grip - either at the wrist or elbow - using a pistol or pocket grip. To maintain control, press your knuckles into your opponent's collarbone and drive your hand deep enough to make contact with their chest, effectively managing the inside space.
Apply the "free joint principle" to adjust your grip: grab the wrist when the elbow is close, or control the elbow when the wrist is attached to the gi. For a pistol grip, use the fabric to create a secure handle. With a pocket grip, tuck your thumb inside the cuff and fold the fabric over it. Always keep your wrist straight and aligned with your forearm; a bent wrist weakens the grip and makes it easier for your opponent to break.
Primary Applications
The collar and sleeve grip is a versatile setup for takedowns, including ankle picks, single-leg takedowns, and seoi nage-style throws. As Olympic Silver Medalist Travis Stevens puts it:
"A concept drilled into every judoka's brain is if you can't grip, you can't throw. It's as simple as that".
From the guard, this grip transitions naturally into the collar-sleeve guard position. It opens up opportunities for sweeps, like the scissor sweep, and submissions, such as triangle chokes and omoplatas. As noted by Savarese BJJ Academy:
"If you control the head, you control the body".
Advantages and Limitations
This grip excels at managing distance and offers strong rotational pulling power, which can expose your opponent's back or arm for further attacks.
That said, it has its downsides. These grips are relatively easy to break compared to more intricate lapel guards. Once your opponent breaks your grip, they often gain an opening for immediate counter-attacks. Additionally, holding these grips for extended periods without a clear plan can lead to quick forearm fatigue. Up next, we’ll compare all nine grips to help you decide which one works best for different scenarios.
Grip Comparison Table
Here's a quick-reference table that breaks down the key details of nine different grips, helping you compare their usage, mechanics, and effectiveness in Gi and No-Gi scenarios.
| Grip Name | Application | Mechanics | Gi vs. No-Gi Effectiveness |
|---|---|---|---|
| C-Grip | Guiding movement, arm drags, guillotine setups | Thumb and fingers form a "C" shape around the wrist or ankle | Highly effective in No-Gi; used for guiding in Gi |
| S-Grip | Head and arm triangles, D'Arce chokes, trapping limbs | Fingers hook together, one palm up and one palm down | Works well in both Gi and No-Gi |
| Gable Grip | Kimura traps, guillotines, paper cutter chokes, body locks | Palm-to-palm connection with fingers cupping the carpal bones; no thumbs | Essential in No-Gi; used in Gi for compression locks |
| Ball and Socket Grip | Body locks, back control, maintaining chokes | One hand forms a fist (ball), the other cups over it (socket) | Commonly used in both Gi and No-Gi |
| Monkey Grip | Neckties, tricep control for arm drags, leg drags | Thumbless grip using four fingers in a cupping motion | Primarily a No-Gi grip; also used in Gi for lat/tricep control |
| Americana (Figure-Four) Grip | Kimura, Americana, toe holds, defending armlocks | One hand grips the opponent's wrist while the other threads under to grab the same wrist | Effective and widely used in both styles |
| Butterfly Grip | Hook sweeps, butterfly guard control, posture management | Hands hook together, often paired with under/overhooks | Mostly seen in No-Gi, especially in butterfly guard situations |
| Pretzel Grip | Specialized hand-to-hand control and transitions | Complex interlocking of hands for specific control | Utilized in both Gi and No-Gi for unique transitions |
| Collar and Sleeve Grip | Takedowns, open guard control, sweeps, breaking posture | One hand grips the lapel, the other grips the sleeve cuff | Primarily a Gi grip; adapts to necktie and wrist control in No-Gi |
This table complements the grip principles already discussed, offering a clear way to identify the best grip for your needs.
Single-handed grips like the C-Grip and Monkey Grip are excellent for guiding and controlling movement, while two-handed grips such as the S-Grip, Gable Grip, and Figure-Four provide unmatched control and stability. Interestingly, your thumb only contributes about 17% of your total grip strength, while your middle finger accounts for 31%, and your index finger adds 22%. This is why thumbless grips - like the Gable Grip and Monkey Grip - are so popular in grappling. By eliminating the thumb, these grips reduce weak points and make it harder for opponents to break your hold.
Use this guide to choose the grip that fits your training goals and scenarios best.
Conclusion
Mastering these nine grips is essential for controlling your opponent, setting up submissions, and dictating the pace of a match. As Stephan Kesting, a BJJ Black Belt and the Founder of Grapplearts, wisely states:
"Win the grip battle and you'll probably win the match."
The fighter who secures their grips first often gains a decisive advantage. Without solid, practiced grips, it becomes challenging to improve positions, dominate exchanges, or execute techniques you've worked tirelessly to perfect. This highlights the importance of combining grip technique with smart energy management.
Strong grips aren't just about brute force - they're about efficiency and strategy. Knowing when to use a C-Grip for swift transitions or a Gable Grip for locks can help you "grip smart", conserving energy while maintaining control. Research even shows that proper finger positioning can significantly enhance grip strength.
Regular practice builds the endurance needed to maintain secure grips during submissions and helps protect against common injuries like tendonitis and wrist sprains. To boost grip endurance, incorporate exercises like dead hangs, farmer's walks, and Gi pull-ups into your routine. An 8-week study found that intermittent dead hangs improved grip strength and endurance by 45%, proving the value of targeted training.
Learning under experienced instructors is key to refining the subtle adjustments that make grips more effective. To find quality training, check out the Brazilian Jiu-Jitsu Gyms Directory. This resource provides detailed listings of academies, including program offerings, instructor credentials, and user reviews, helping you choose the right environment to develop your skills. Hands-on feedback during live sparring sessions can make all the difference in improving your grip game.
Whether you're perfecting collar and sleeve grips or fine-tuning the figure-four, remember that grip training is an ongoing process. Stay consistent, train wisely, and focus on building both strength and technique to take your BJJ skills to the next level.
FAQs
What’s the difference between Gi and No-Gi grips in Brazilian Jiu-Jitsu?
Gi grips involve grabbing onto your opponent's uniform - think collar, sleeves, lapel, or even the edges of their pants. These grips give you more control over their posture, help set up sweeps, and make it easier to lock in submissions. The fabric adds friction, which naturally slows down the pace and shifts the focus toward grip-fighting and breaking your opponent's holds.
No-Gi grips, on the other hand, skip the uniform entirely. Instead, you control your opponent’s body directly using techniques like wrist control, underhooks, overhooks, head-and-arm clinches, and leg entanglements. Without the fabric to hold onto, movements tend to be quicker, and success leans heavily on body positioning, pressure, and timing rather than gripping strength.
Both approaches center on controlling your opponent, but the key difference is how it's done: Gi relies on manipulating the uniform, while No-Gi demands precision in controlling the body itself.
What are the best ways to improve grip strength for Brazilian Jiu-Jitsu?
To build stronger grip strength for Brazilian Jiu-Jitsu, it’s essential to mix on-the-mat drills with targeted strength exercises. During sparring, focus on grips like the lapel, sleeve, or two-on-one. This not only sharpens your technique but also builds endurance in real-time scenarios.
Off the mat, you can use simple tools and exercises to strengthen your hands, wrists, and forearms. Grip trainers, farmer’s walks, and towel drills are great starting points. For variety, try wrist curls, static hangs from a pull-up bar, or even digging into a bucket of rice to work your fingers and forearms in unique ways.
To keep progressing, gradually increase the weights, repetitions, or duration of these exercises every few weeks. This approach helps you avoid plateaus and ensures steady improvement. With consistent effort, you’ll see noticeable gains in your grip strength and performance on the mats.
What is the best BJJ grip for beginners to start with?
For those new to Brazilian Jiu-Jitsu, the pistol grip is a great place to start. It’s gentle on the fingers while still offering solid control over your opponent’s gi. Plus, it’s straightforward to pick up, making it perfect for beginners who are just starting to build confidence and get a feel for grip mechanics.
When practicing, aim for a grip that’s firm yet flexible so you don’t wear out your hands too quickly. Nailing this grip early on can give you a strong base to tackle more advanced techniques down the road.
Related articles
Share this article