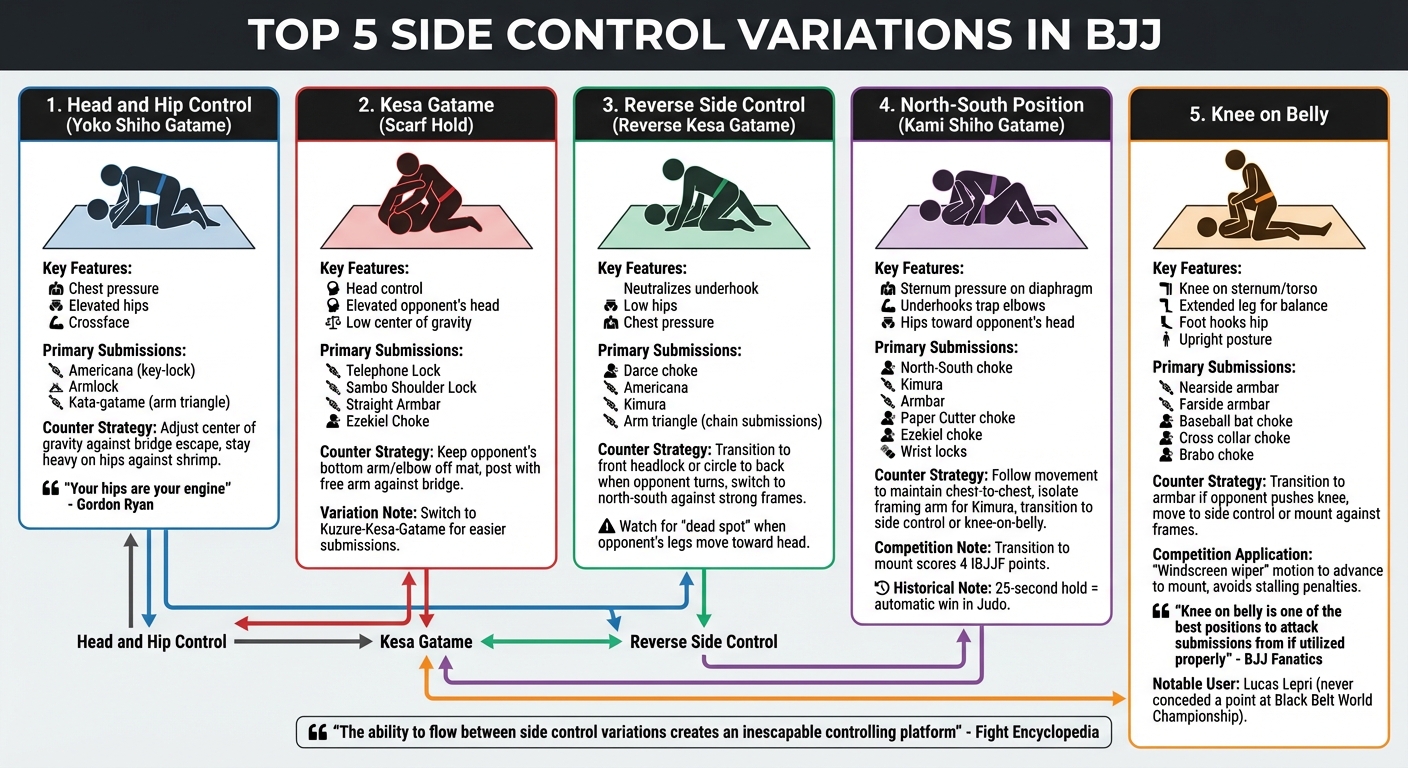
Top 5 Side Control Variations in BJJ
Learn five side control positions in BJJ with pressure points, escape counters, and submission transitions for dominant top control.
Written by BJJ Academy Finder Editorial Team
Top 5 Side Control Variations in BJJ
Side control is a core position in Brazilian Jiu-Jitsu (BJJ), offering control, pressure, and opportunities for submissions or transitions. To dominate effectively, you need to understand multiple variations of side control and how to flow between them. Here are the top five:
- Head and Hip Control: Pin your opponent with chest-to-chest pressure, using techniques like the Americana or arm triangle.
- Kesa Gatame (Scarf Hold): Control the head and arm, limiting escapes while opening submissions like the armbar or Ezekiel choke.
- Reverse Side Control: Face your opponent's legs to counter underhooks and set up attacks like the Darce choke.
- North-South Position: Align head-to-head for unique submissions like the North-South choke and stronger pinning pressure.
- Knee on Belly: Use upright pressure to restrict movement and transition to submissions or mount.
Each variation counters escape attempts and creates submission opportunities. The ability to transition smoothly between them ensures you stay in control while keeping your opponent off balance.
5 Side Control Variations in BJJ: Positions, Submissions, and Applications
5 Fundamental Side Control Positions in BJJ You Should Know
sbb-itb-d583f1e
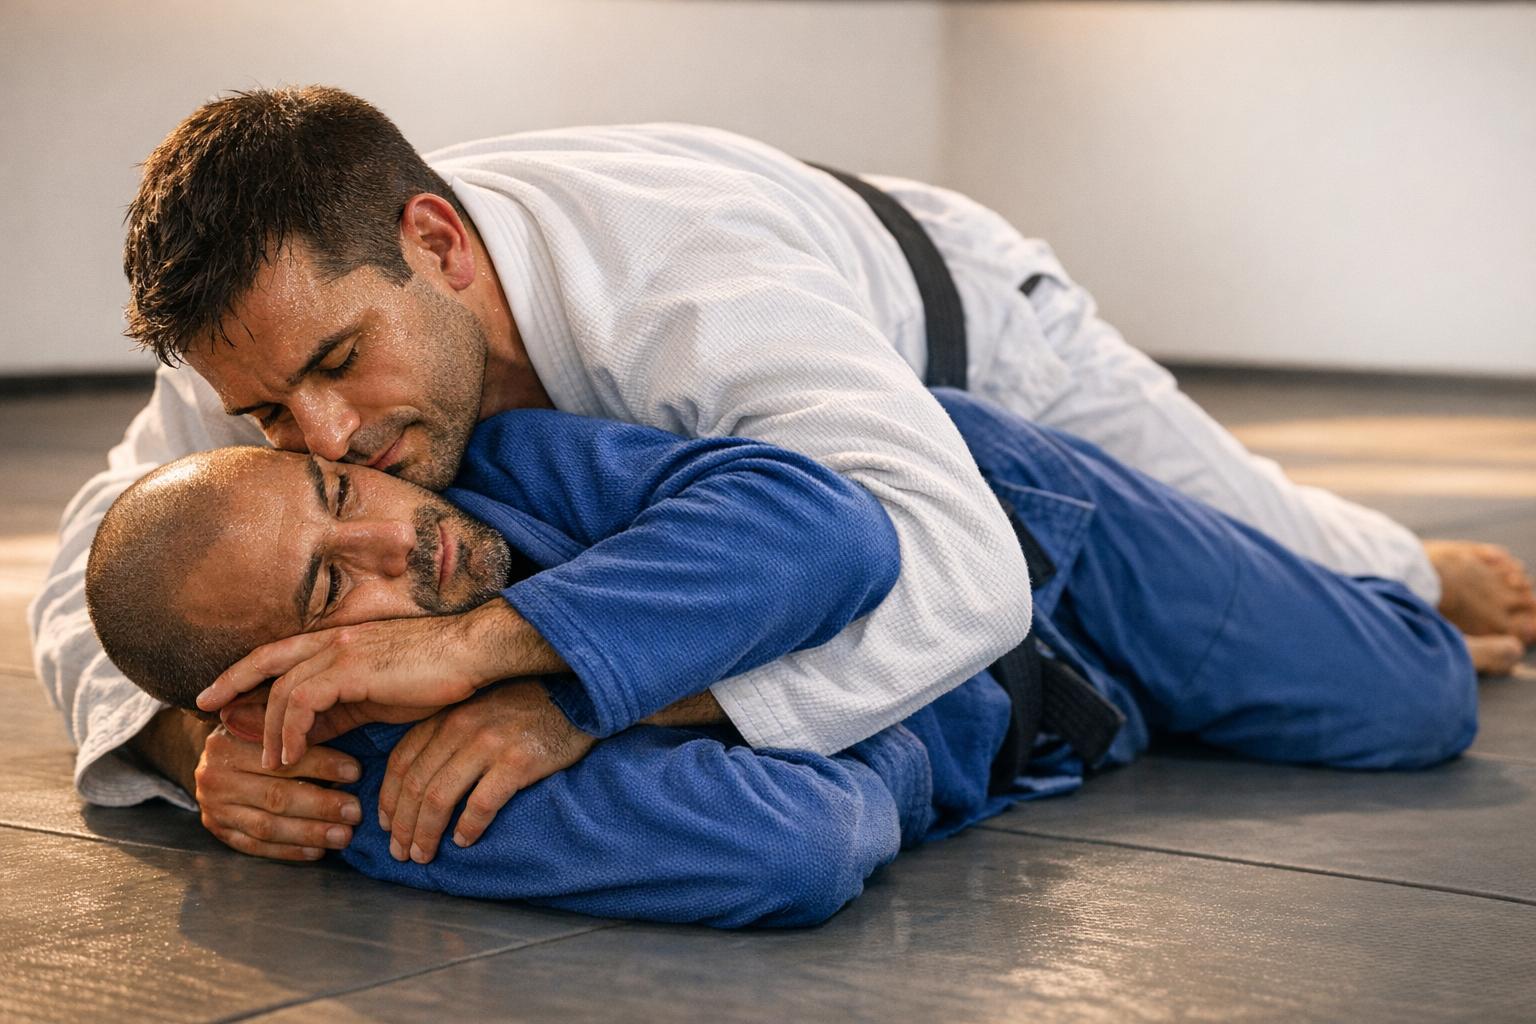
1. Head and Hip Control
Head and hip control, often referred to as side mount or yoko shiho gatame in Judo, is a cornerstone of Brazilian Jiu-Jitsu (BJJ). If you're looking to start your journey, you can find a BJJ gym nearby to begin training. This position involves placing yourself perpendicular to a supine opponent, using your weight to pin them down by applying pressure to their chest.
Control and Pressure Effectiveness
By elevating your hips and channeling pressure onto your opponent's chest and torso, you can significantly limit their breathing and mobility. As Gordon Ryan aptly puts it, "Your hips are your engine" [4]. Adding a strong crossface can misalign their spine and neutralize defensive frames, making it even harder for them to move or counter effectively.
Transitioning to Submissions
Side control isn't just about maintaining dominance - it sets the stage for high-percentage submissions. The Americana, or key-lock, is a classic attack from this position [2]. Another powerful option is the kata-gatame (arm triangle), where you trap your opponent's head and pin one of their arms against their neck [2]. These transitions from control to submission highlight how side control can lead directly to decisive finishes.
Defending Against Escapes
Anticipating and countering escape attempts is crucial. For example, if your opponent attempts the bridge (upa escape) by driving their feet toward their glutes for explosive power, you can counter by adjusting your center of gravity to stay balanced and prevent them from rolling you over [4]. Similarly, if they try to shrimp their hips away, staying heavy on their hips and using firm, bone-on-bone frames with your forearms can effectively block their movement. Marcelo Garcia offers a key piece of advice: "Escape before you're flattened" [4].
Becoming proficient in this control opens the door to exploring other variations of side control, each with its own unique benefits for maintaining dominance and advancing your position.
2. Kesa Gatame
Kesa Gatame, often called the scarf hold, is a staple position in modern BJJ. Adding this to your repertoire enhances your side control options, building on the techniques discussed earlier. This position involves wrapping your arm around your opponent’s head while securing their near arm, creating a pin that significantly limits their ability to escape.
Control and Pressure Effectiveness
Kesa Gatame builds on the fundamentals of side control by focusing on controlling your opponent’s head to neutralize their escape attempts [5]. Elevating their head reduces their ability to bridge effectively [5]. As Kyuzo Mifune, a 10th Dan Judo Master, explains:
Tori's arm should lift uke's head and tori's leg should be under uke's shoulder [5].
To maintain control, apply pressure through your chest, driving it into their sternum, while keeping your head low on the same side as the arm you’re holding. This lowers your center of gravity and helps prevent roll-overs [5].
Proper leg positioning is crucial for stability. Extend your lead leg parallel to your opponent’s torso as a post, and keep your trail knee bent and grounded. Avoid raising your trail knee, as this increases your center of gravity and makes you less stable [5].
Transitioning to Submissions
Kesa Gatame isn’t just about control - it opens up several submission opportunities. High-percentage attacks from this position include the Telephone Lock, Sambo Shoulder Lock, and Straight Armbar [6]. The Ezekiel Choke is another effective option [6]. If submissions feel difficult from the classic head-wrap version, switch to Kuzure-Kesa-Gatame (modified scarf hold). By encircling your opponent’s arm instead of their head, you’ll find submissions are often easier to execute [2]. This combination of control and submission options makes Kesa Gatame a versatile tool for countering escapes [7].
Countering Opponent Escapes
A common escape attempt from Kesa Gatame is the "belly down" movement, where your opponent tries to turn away. To counter this, focus on keeping their bottom arm and elbow off the mat [7]. If their elbow touches the mat, immediately pull it up to disrupt their base [7]. When facing an explosive bridge, be ready to post with your free arm while maintaining a low center of gravity [7].
As Fight Encyclopedia highlights:
The ability to flow between side control variations (standard → kesa → reverse kesa → north-south) in response to the bottom player's escape attempts is what creates an inescapable controlling platform [1].
3. Reverse Side Control
Reverse Side Control, often referred to as reverse kesa gatame, involves switching your hips to face your opponent's legs rather than their head. This adjustment neutralizes the effectiveness of your opponent's underhook, making it harder for them to rise to their knees. By flipping the typical stance, this position disrupts common escape strategies and opens up pathways for unique submission opportunities.
Control and Pressure Effectiveness
To maintain control in this position, focus on applying heavy but adaptable pressure. Keep your hips low to the mat, drive your chest into your opponent's midsection, and use your toes to generate additional force. This combination keeps your opponent pinned and limits their movement.
One thing to watch for is the "dead spot." If your opponent shifts their legs toward your head, they can create a balance point to roll you over. Use reverse side control as a dynamic position, transitioning fluidly to other control points to keep your opponent off balance and prevent escapes.
Transitioning to Submissions
Reverse side control creates excellent opportunities to attack submissions, particularly during your opponent's escape attempts. For example, the Darce choke becomes highly accessible when they try to scramble out. Additionally, this position allows you to link submissions together seamlessly. Practice chaining moves like the Americana, Kimura, and arm triangle to maintain relentless offensive pressure while transitioning.
Countering Opponent Escapes
When your opponent secures an underhook and attempts to turn onto their belly, be prepared to counter. Transition into a front headlock or circle toward their back as they try to rise. Lachlan Giles offers this advice:
Be ready to sit to one side and apply an underhook as your opponent circles to attempt to find a route to your back [8].
If your opponent establishes strong frames, switch to north-south or standard side control to dismantle their defenses and reset their escape attempts. The ability to flow between these variations, as noted by Fight Encyclopedia, creates what they describe as an "inescapable controlling platform" [1].
4. North-South Position
The North-South position continues to expand your control options, offering angles and setups that are distinct from other variations. In this position, you're aligned head-to-head with your opponent, opening up opportunities for unique chokes and transitions [9]. Unlike standard side control, where your hips stay close to their body, North-South shifts your hips toward their head. This adjustment minimizes their ability to execute a strong hip bridge, making it particularly effective against opponents who are bigger or stronger [10]. With this foundation in place, you can explore control, submissions, and counters in greater detail.
Control and Pressure Effectiveness
Control in North-South hinges on using your chest for pressure. Press your sternum into their diaphragm to restrict their breathing and limit movement [9][12]. Keep your hips low to the mat and eliminate any gaps between your chest and theirs to prevent them from setting up frames [9]. Your hips and legs, two of your strongest body parts, work to immobilize their upper body by pinning their shoulders [10]. Underhooks are crucial here - use them to trap their elbows against your ribs, stopping them from framing or turning to their side [12]. In Judo, this position is known as Kami Shiho Gatame, and historically, holding this pin for 25 seconds secured an automatic win [10]. With solid control established, you’re in an excellent position to set up aggressive submission attacks.
Ease of Transitioning to Submissions
The North-South position offers direct access to several effective submissions, including the North-South choke [9]. Other high-percentage options include Kimuras, armbars, and, for those using a gi, the Paper Cutter and Ezekiel chokes [11][9]. Wrist locks can also be a sneaky option when your opponent focuses on defending their neck or shoulders [11]. By constantly threatening these submissions, you keep your opponent on the defensive, making it harder for them to commit to escape attempts. While the position itself doesn’t earn points under IBJJF rules, transitioning from North-South to mount can score you 4 points [9].
Countering Opponent Escapes
As with other side control variations, staying a step ahead of your opponent’s escape attempts is key. If they try to create an angle, follow their movement to reestablish chest-to-chest pressure [12]. If they manage to set up a forearm frame, isolate that arm immediately to set up a Kimura - this often forces them to abandon the escape to protect their shoulder. Should they begin turning or developing strong frames, transition smoothly back to side control or move into knee-on-belly to maintain control and dominance [11][9].
5. Knee on Belly
Knee on belly is a versatile addition to your side control game, offering a mix of pressure and mobility. Unlike the chest-to-chest approach of traditional side control, this position uses an upright stance to boost movement options. Your knee is placed directly on your opponent's sternum or torso, while your other leg stays extended for balance. By hooking your foot against their hip, you not only stabilize the position but also limit their ability to escape. The concentrated pressure makes it harder for your opponent to breathe and move effectively [3][13].
Control and Pressure Effectiveness
To apply maximum pressure, lift your chest slightly while driving your knee into your opponent's torso. This technique increases the force on their midsection and diaphragm, making it uncomfortable for them to resist. At the same time, it keeps you mobile enough to adapt to their defensive attempts. Transitioning into this position from side control involves securing a grip on their collar or pinning their shoulder to the mat while controlling their hip. From there, "pop up" to position your knee. This upright posture not only enhances your offensive options but also helps avoid stalling penalties in competition by clearly showing active engagement [1][3][13].
Ease of Transitioning to Submissions
Knee on belly isn't just about control - it’s also a launchpad for submissions.
"Knee on belly is one of the best positions to attack submissions from if utilized properly."
The pressure forces your opponent into a tough spot: defend their neck or relieve the weight on their chest. This opens up opportunities for submissions like nearside and farside armbars, baseball bat chokes, cross collar chokes, and brabo chokes. For example, the nearside armbar often appears when your opponent instinctively extends their arm to escape, while the farside armbar usually requires a more deliberate setup. The discomfort caused by your knee can also leave their collar exposed, making it easier to secure a cross choke. Lucas Lepri famously used this position to dominate during his Black Belt World Championship run, never conceding a single point - thanks in large part to his mastery of knee on belly [14].
Applications in Training and Competition
In competition, knee on belly is an excellent transition point between side control and mount. To advance, use a "windscreen wiper" motion to swing your foot over their torso while maintaining upper body control. This fluid movement keeps your offense dynamic and avoids any appearance of stalling in the eyes of judges. During training, practice switching hips or knees to counter your partner's attempts to scramble or recover guard. Use your forearm, knee, or hip to block their nearside hip and prevent them from regaining control [3].
Countering Opponent Escapes
If your opponent tries to push your knee to create space or frames effectively, you can respond by transitioning to an armbar or moving back to side control or mount. The mobility of knee on belly allows you to flow with their movements instead of locking into a static position. This adaptability makes it a crucial link between side control and mount, keeping you one step ahead of your opponent.
Conclusion
Mastering side control variations creates a strong, adaptable foundation that works well against opponents of varying sizes, skill levels, and defensive tactics. The ability to shift smoothly between positions like standard side control, kesa gatame, reverse side control, north-south, and knee on belly keeps your opponent from settling into predictable defensive patterns.
"The ability to flow between side control variations (standard → kesa → reverse kesa → north-south) in response to the bottom player's escape attempts is what creates an inescapable controlling platform."
- Fight Encyclopedia [1]
Reacting to your opponent’s movements is critical. Practicing submission chains - like transitioning from americana to kimura to an arm triangle - keeps your opponent constantly guessing [1][3]. A short base is ideal for attacking submissions, while a long base helps neutralize stronger or more aggressive opponents [3]. Regular positional sparring and flow drills are essential for honing timing, pressure control, and smooth transitions [15]. These skills not only enhance your ability to maintain control but also open up opportunities for decisive attacks, allowing you to take calculated risks with confidence.
If you're looking to refine these techniques further, the Brazilian Jiu-Jitsu Gyms Directory at bjjacademyfinder.com is a great resource. It connects you with academies across the United States, offering details on programs, instructor qualifications, and user reviews. Training in the right environment can make all the difference in developing a side control game that’s both precise and effective.
FAQs
How do I choose the best side control variation for my opponent’s escapes?
To pick the most effective side control variation, think about how your opponent typically tries to escape and the exact position you're working from. For instance, a standard side control can offer solid control, but it might leave room for escapes if you accidentally create space. To counter this, you can adjust your base or apply tighter pressure, cutting down their opportunities to slip out. The key is to choose variations that keep you in control while limiting their escape routes, all while playing to your strengths and adapting to their strategies.
What are the most common mistakes that make side control lose pressure?
Side control can lose its effectiveness if pressure isn't applied correctly. Common mistakes include placing your weight on the mat instead of your opponent, which makes it much easier for them to escape. Another frequent error is positioning your hips too high, unintentionally creating space that allows the person on the bottom to recover their guard. To avoid these problems, focus on keeping your weight directly on your opponent and maintaining control of the space between you and them. Proper weight distribution and tight positioning are key to holding side control effectively.
How can I drill smooth transitions between side control, north-south, and knee on belly?
To get better at transitioning between side control, north-south, and knee on belly, focus on drills that prioritize smooth movement and control. Begin in side control, then shift into knee on belly while maintaining proper grips. From there, transition into north-south by carefully adjusting your weight and body positioning. Repeating these sequences consistently helps develop muscle memory and improves your ability to move fluidly. Pay attention to deliberate and controlled movements, as this will make your transitions more effective during sparring or competition.
Related articles
Share this article